Take A Picture Of Your Own Hand
This is just one example of how to draw, and everyone has their own way of drawing.
It is best to draw in a way that is comfortable for you, but since hands have a complex structure, it is important to draw while observing the real thing.
Take a picture of your hand or look at it in a mirror and observe it while you draw.
If you are a beginner and have a digital painting tool, you can try tracing your own hand taken with your smartphone.
I hope youll try your hand at various hand shapes.
Drawing Thumb & Fingers
For the purpose of the tutorial I will fully draw out the structure of all the fingers for you to use as a reference. You do not need to do this but you should be aware of the positioning of the invisible parts of the fingers to avoid mistakes when drawing that parts that are visible. For example if you can only see the tip of the pinky but you dont consider the length of the rest of the finger you can end up drawing the tip too far up or too far down the hand.
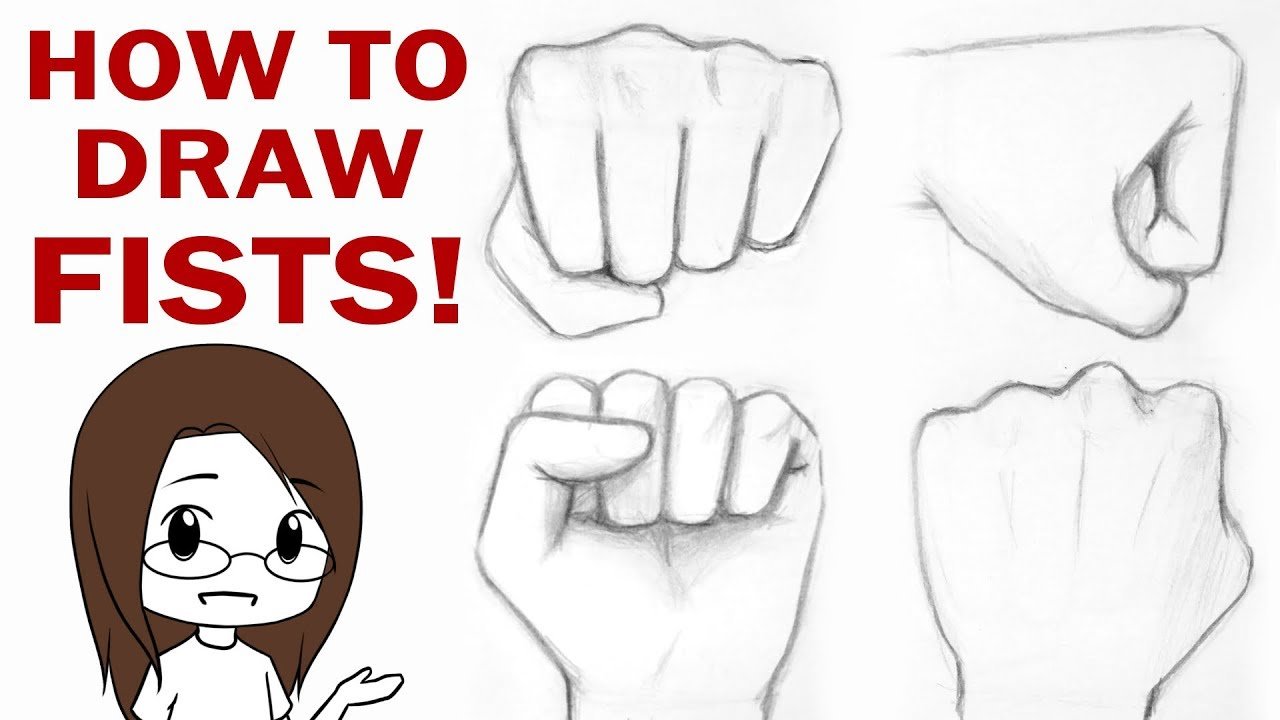
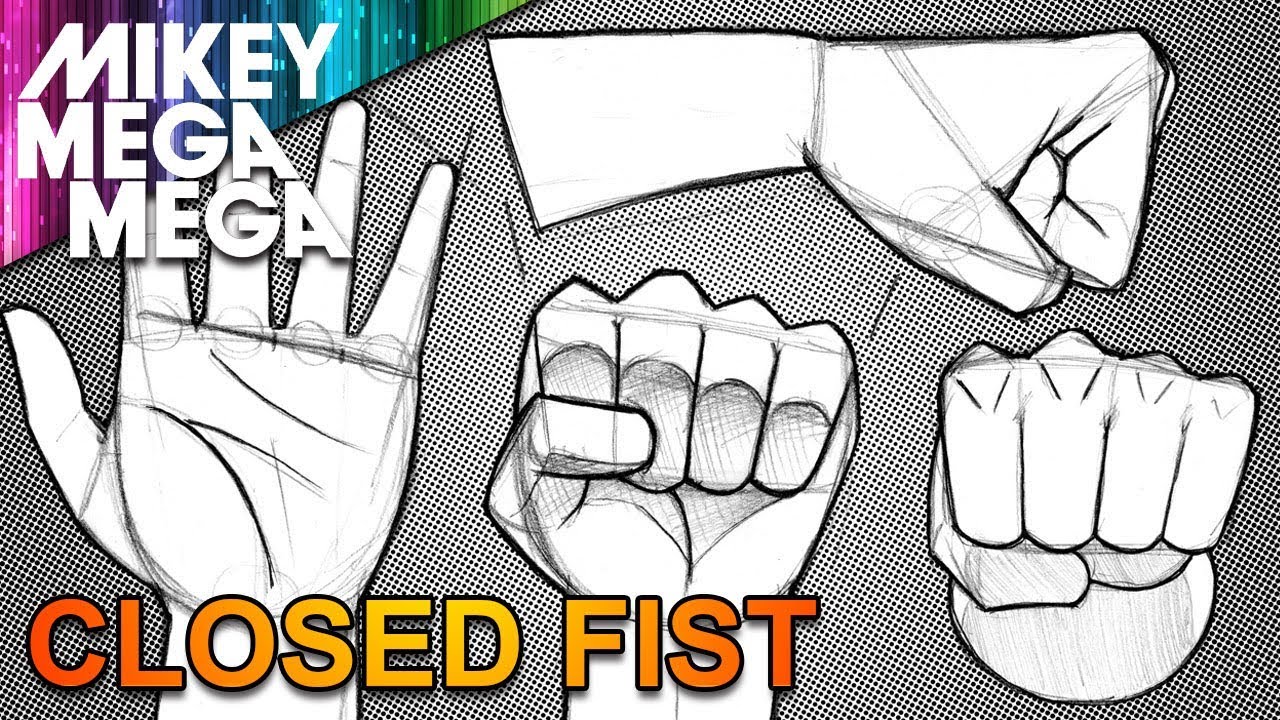
How To Draw A Clenched Fist
Flickr – Photo by giovanna baldini
A clenched fist can be a gesture done by a character to show a joyous celebration over some victorious events. It can also show the spirit of a character. Alternatively, characters who are involved in a fight will also clench their fists. So, we truly understand that drawing a clenched fist is inevitable.
If you want to learn how to draw a fist properly, follow the instructions given below:
1. Draw contours of thumb and wrist. Start projecting the form of a thumb.;
2. Then, divide the thumb into 3 parts by marking light lines and then begin drawing 2 parallel lines. Their ends are defined by the border of the first segment of the thumb.
3. Next, continue creating the other 2 segments of the thumb. Remember that the finger is lowering down at the top.
4. Smooth the lines to provide them with the realistic appearance of a wrist and a thumb. Create more roundish lines according to the outlines and bypass any angularity. Dont forget to add some wrinkles, notably under the thumb. Erase the contour once finished.
5. Add index finger and long finger. Apply long strokes to get the realistic form of a clenched hand.
6. Create the borders of the annular and pinkie fingers. With the same trick as you did before, smooth the lines and erase the contours.
7. Illustrate details and shading like the nail on the thumb and the wrinkles around places where the skin folds.
Recommended Reading: How To Draw Anime Beards
How To Draw Fingers
Let’s learn how to draw the shape of the fingers now.
Step 1
Draw a big circle at the base of the finger.
Step 2
Draw a smaller circle at the second joint. Connect it to the first one. These lines should taper a little. Also, if you draw the bottom of the phalanx, remember to add a curve.
Step 3
Drawn an even smaller circle at the last joint. Connect it to the previous one. This phalanx doesn’t have a lot of cushion, so the curve only appears if the finger is bent.
Step 4
Draw the tip of the finger in the shape of a smooth wedge. Avoid completely pointed tips, unless you’re drawing your character in a deformed style.
Step 5
Add the nails at the halfway point of the last phalanx. They should be very subtletheir outline can’t compete with the more important outline of the whole hand.
Step 6
Don’t forget about webbing between the fingers!;
Drawing Anime Hands Proportions

If youre familiar with my tutorials, you know that I am not a big proponent of learning exact proportions for everything. Proportions will change depending on what you want to draw.; Proportions change given the perspective and foreshortening of the subject. Over time you must learn to gauge proportions and correct based on what you are drawing. However, there are a couple of rules that are very helpful in drawing the hand and we can use them for drawing anime hands.
Don’t Miss: Where To Train Durability In Anime Fighting Simulator
How To Draw A Fist Side View
Unsplash – Photo by Ian Noble
Youll also need to draw a fist gesture when you want your character to, say, hold a grocery bag. Drawing it from a side view is easy, just follow the steps below:
1. Draw the contour of the overall shape of the whole hand from the side view. Next draw the shape of the side view of the palm.
2. Draw closed palm and finger proportions from the side view. Get the proportions for the pinky.
3. Stroke the lines resembling a pinky and the rest of the fingers. Get the proportions for and draw out the thumb.
4. Clean up your drawing and add the details.
Sketch The Basic Shapes And Lines Of The Hand
Sketch the main shapes and lines of the hand first, using a hands reference photo.
From a reference photo, sketch the basic shapes and lines of the hand. Dont worry about the lines being perfect at this stagethe goal is to lay the foundations of your hand drawing.;
Using digital drawing software can make this process a bit easier as you can draw directly on top of your reference photo first and then drag it to its own space for further development. This will help get the proportions right. You can follow a similar process with a pencil and sketchbook, though.;
Recommended Reading: Fairy Tail Season 10 Trailer
Anterior Angle Of The Hand
Fingers Bend At The Joint Not At The Base
When you make a goo motion with your hand, where does the finger bend?
We tend to think that it is from the base of the finger, but in fact it bends from the metacarpophalangeal joint.
When viewed from the palm of the hand with skin on it, it is bent from the crease in the image.
When viewed from the side, you can clearly see where the bend is on the back and palm side of the hand.
You can see that the back side of the hand is bent from the joint, and the palm side is bent from the crease in front of the hand, not where the fingers part.
The next point to keep in mind is that the joint arches lightly.
This feature is more pronounced when the fist is viewed from the front.Try drawing the goo, paying attention to where the fingers bend and the shape of the joints.
Don’t Miss: Is There An Anime For Danganronpa 2
How To Draw An Anime Fist Front View
Start with a circle shape and an open triangle on top.
Add one big rectangle for the four fingers and another shape for the Thumb.
Start with drawing finger shapes this time. Remember, were not fully showing the four fingers.
Add the joints. For this type of sketch is better if you draw as many as you can, not only the main ones. It will give structure to your drawing.
To finish the sketch: lengthen the lines for the wrist.
Use the arrows to guide you once again. Pay attention to the upper joints and that little fold on the right.
Outline all the important traces of your sketch.
Clean the sketch keeping a clean Lineart.
Add details such as lines and wrinkles. Dont forget to draw palm lines and the wrinkles that happen to your hand palm when you press your fingers against it.
Add shadows for better results.
How To Draw An Anime Hand Pointing
Start with the palm shape.
Add a rectangle and a descending form .
Draw fingers following the shapes you already got.
Draw the joints, this time, only four are showing.
To finish the sketch: lengthen the lines for the wrist.
Use the arrows to help you with two of the joints and the Thumbs curve.
Outline all the important traces of your sketch.
Clean the sketch keeping a clean Lineart.
Add details such as lines and wrinkles. Dont forget the other joints . It will help your drawing to look more realistic.
Add shadows where necessary.
Recommended Reading: What Does Anime Mean In English
The Anatomy Of Anime Hands
Anime hands, though so smooth and simple, share their basic structure with real hands. If you understand this structure properly, everything will be easier for you! Let’s start with the bones.
As you can see, the fingers are longer than they appear. They’re “buried” inside the palm, which makes this part less flexible. That’s why for practical reasons it’s better to see fingers as starting where the palm ends. The thumb is an exception hereit’s far away from the rest and can move on its own, not being limited by the palm.
Each finger has three joints. The sections between them get progressively shorter. The thumb again is an exceptionit only has two joints, and its bones are similar in length.
Of course, we don’t really need to know the boneswe need to know their function and how they affect the look of the hand. The simplified structure of the hand consists of:
- the heads of the forearm bones
- the wrist
- the palm
- the thumb base
- four three-segmented fingers
- one two-segmented thumb
It’s very important to memorize this fan-shape rhythm between the joints. It influences the look of the hand, regardless of the pose of each finger. It makes it easier to guess the position of each joint in relation to the others, even the thumb’s.
Understanding Basic Hand Anatomy To Draw Anime Hands

I published a very detailed tutorial that covers drawing and anatomy of the hand. This tutorial can be found at the following link.;
Below, lets cover the very basics we need to understand about the structure of the hand for anime and manga drawing.;
The metacarpals create the palm of the hand, fingers stem from these bones.
Phalanges are the bones of the fingers, notice how each finger has three joints one at the knuckle one in the middle and one closer to the tip.
Notice also that the thumb has only two phalanges.;The third joint is at the metacarpals back at the wrist area. This will become important when you draw the thumb, as it will have only two visible joints compared to the three for the fingers.
Recommended Reading: How Not To Summon A Demon Lord Uncut Scenes
Drawing Anime Hands A Step
The glove/mitten method stems from the fact that most of us can better imagine and draw a glove or a mitten than a detailed anime hand.
You dont have to worry about drawing in fingers. With this method, you only worry about the general shapes. Controlling general shapes is basis for all good drawing. That is to say, every great drawing starts with the artist having full control of the general shape of what they are drawing.
Start drawing anime hands with a simple boxy shape of a glove or a mitten. With this type of simplification fingers are indicated with one rectangular shape, then the simplified form is drawn over with more detail and by adding divisions of the fingers.
Above is a good example of how the glove/mitten method works.
When you draw the simplified form, think about the general shape of the hand, its proportions, the general gesture. Worry about the details on the second pass.
Above is an example of a very simplified form drawn for the fist. Note that, although the fingers twist down, I was able to draw that in later.
It was easier to draw because the general shape and perspective of the drawing was resolved in the simplified and boxy under-drawing on the left.
Note that all of the drawings of anime hands I made for the tutorial start with the general shape of the palm.
Below are two more examples.
How To Draw A Fist In 4 Different Ways
Tripboba.com – The fist is the gesture formed when the fingers and thumb are curled inwards into the palm. Drawing a fist is actually not that hard, but if we really want to picture that specific part of the body as accurately as possible, it might be tough for some of us.
Sure we dont have to draw everything realistically, but learning to draw properly is essential, after all. It might be easy to draw a fist, from a front view. But what if we want to draw it from different angle?
So, if youre interested on how to draw a fist from some different point of views, this article has provided you with the basics, so keep reading!
Don’t Miss: Drawing Anime On Computer
How To Drawn An Anime Hand Side View
Star with an oval shape. Thats the palm shape.
Add a rectangle on left termination of the shape and another structure for the other four fingers. Start with a bigger form that decreases as approaching the center of the drawing .
Draw small circles where the main joints should be. In this drawing, not all of the joints are showing, so there are going to be only two.
Start drawing fingers following the shapes you already have.
To finish the sketch: lengthen the lines for the wrist.
Use the arrows to help you with the hands bone structure. I think thats the trickiest part.
Outline all the important traces of your sketch.
Clean the sketch keeping a clean Lineart.
Add details such as lines and wrinkles, and nails.
For better results, add shadows to give dimension, especially on the three fingers past the index finger.
A Hand Holding A Sword
Also Check: How To Draw Anime Girl Mouth
Let’s Work With The Basic Technique Of Sketching Anime
How To Draw An Anime Face Sideways : anitech it also add eyebrows, by drawing curved lines facing downwards.
Add Details For The Clenched Fist
We will now add in details for the clenched fist, how many wrinkles there are and how thick they should be.
We will also erase any guidelines we had drawn in from the rectangular prisms and tidy up some of the pencil work so that we see what now looks like a clenched fist.
Make sure you pay attention to where your knuckles end up when drawing this out as it can have an effect on how much detail is drawn into each wrinkle or crease.
Your hand is flexible so try not to make the lines too flat as it can affect how your fist looks.
Dont forget about the thumb.
Add some rough shadow lines with a soft pencil like a 6B or with a pastel or chalk. Something that is easy to smudge and blend.
Also add a nail for the thumb. Note where the shadows are on your hand and block them in here as well.
What I like to do next is smudge those rough shadow lines so that tha pencil or chalk marks are smooth and start to look more like a blurred realistic hand. You can use an eraser to help highlight lighter spots if you need to.
At this stage you can darken the shadows and also the deeper lines and add some creases in the knuckles and folds of skin around the palms and also where the fingers press into the palm as it creates a clenched fist.
Add some darker shadows around the wrist and edges of the hand to make it look more realistic. Smudge or blend your pencil more if needed.
Thats it! It is realistic enough for a clenched fist drawing.
You May Like: How To Draw Male Anime Face
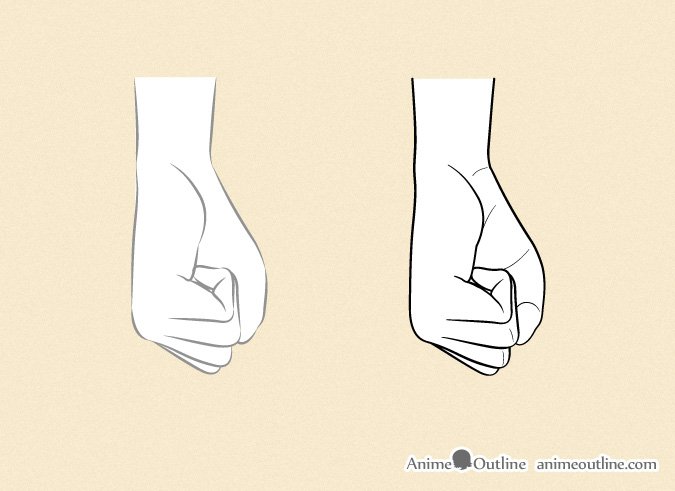
How To Draw An Anime Fist Side View
Draw a shape following the structure of a closed fist. You already including the fingers.
Add a rectangle of the Thumb. And the three showing joints.
Follow the already existing shapes for drawing fingers .
To finish the sketch: lengthen the lines for the wrist.
Follow the narrows for the wrist.
Outline all the important traces of your sketch.
Clean the sketch keeping a clean Lineart.
Add details such as lines and wrinkles. Dont forget to draw palm lines!
For better results, add shadows to give dimension.
Anime Hands Using 3d Shapes

You May Like: How To Draw Anime Girl Mouth